Audacity: Free Audio Recording & Editing Software
Hmmm… Some Features I’ve Seen Before Somewhere!
If you are used to using a computer, there will be things about ‘Audacity’ that are already familiar to you. In many ways, working with ‘Audacity’ will be just the same as working with a word processor.
If you can
- type a letter
- delete words and phrases
- copy and paste words and phrases
- and save your letter…
… then using Audacity is going to be really easy for you!!
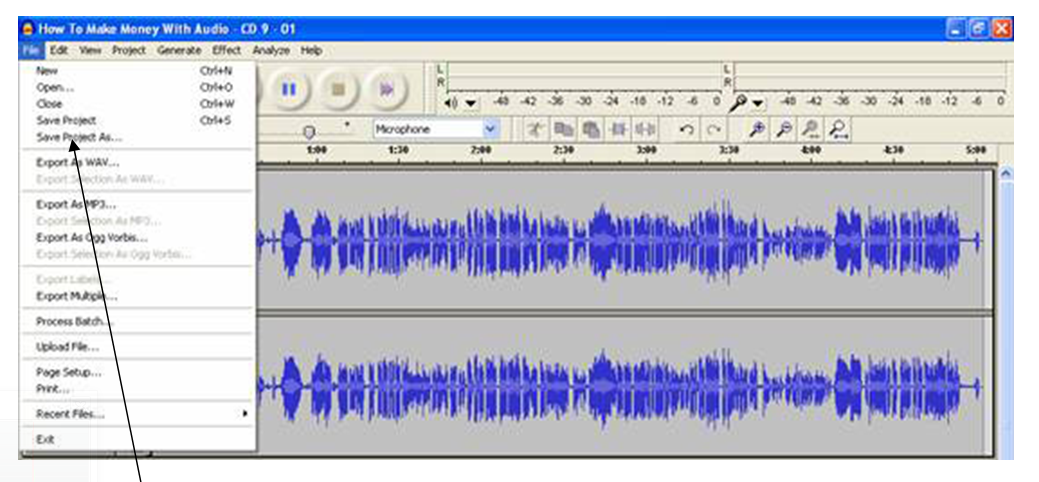
In the top left-hand corner of the screen there are number of menu items. You can see the ‘File’, ‘Edit’, ‘View’ and ‘Help’ menu’s which in many ways have exactly the same features as a word processor.
The ‘File’ menu (above) for example has these familiar functions
- ‘new’ – for new projects
- ‘open’ – to open existing projects
- ‘save project’ – to save existing projects
- ‘close’ – to close existing projects
(A ‘project’ in ‘‘Audacity’’ is a collection of all the different sounds and recordings you have in one recording project – for example, your voice and some background music – which you can ‘save’ as a project to finish working on another day).
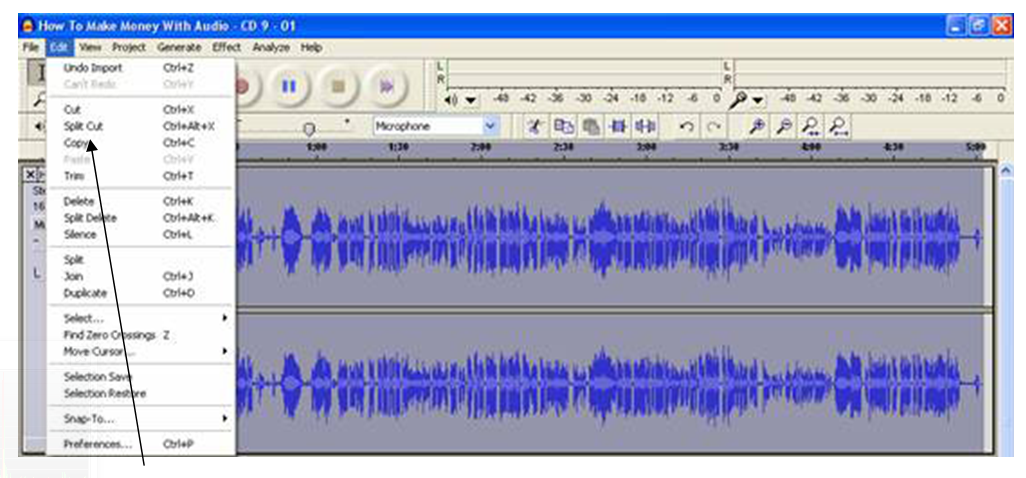
The ‘Edit’ menu (above) has
- ‘cut’ – to cut sections of audio
- ‘copy’ – to copy sections of audio
- ‘paste’ – to paste to sections of audio
The ‘view’ menu (below) has a ‘zoom’ facility.
- to zoom in and magnify the soundwave for a more detailed view
- to zoom out and see the overall view
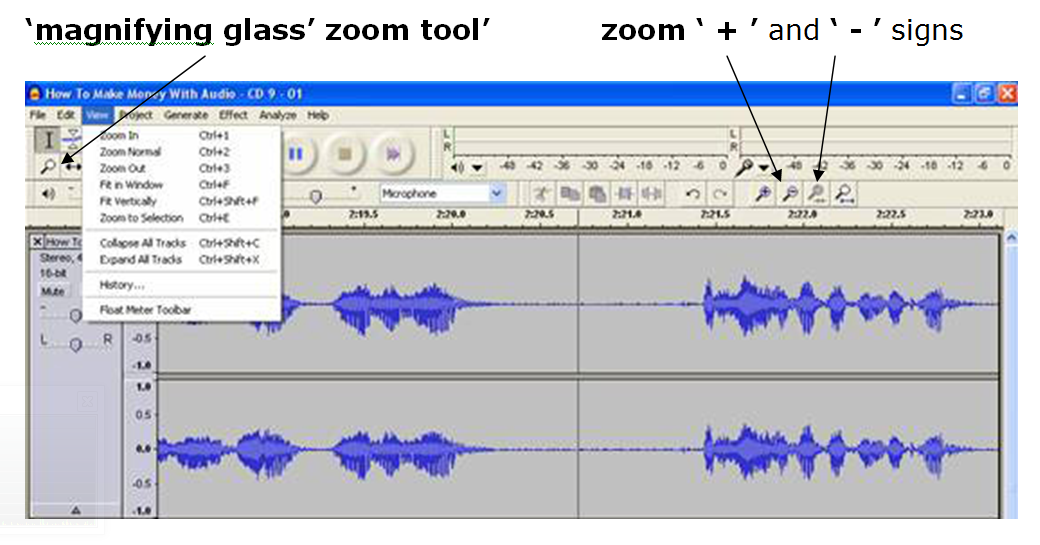 I have clicked on the zoom ‘ + ’ a few times in the above picture, and you can now see the magnified soundwave in more detail.
Please note: it’s much quicker and easier to use the ‘magnifying glass’ zoom tool (with the ‘ + ’ and ‘ – ’ signs) towards the right hand end of the tool bar.
So as you can see, so far many of the basic functions are pretty much the same as you would use when writing a letter or any other text document and the basic principles of editing an ‘ audio document’ are exactly the same.
Simply select the area you want to delete, cut or copy by clicking and dragging your mouse to highlight it (just as you would in a standard word processor) and then delete (or select or new point in the audio to paste from the clipboard– just as you would in a letter or e-mail).
If you make a mistake, simply ‘Undo’ (in the ‘Edit’ menu or use the ‘control’ & ‘Z’ keys).
This is just a brief overview and introduction to audacity, and as you can see it is a very simple programme with familiar controls and concepts which you will find yourself getting used to and using quickly and easily.
This post was adapted from my “Easy Audio” ebook series.
Audio Recording on a Computer
The Complete Recording Studio in One Box!
Audio recording on a computer is without a doubt the most powerful and flexible way to record. Once you have learned the basics of recording on computer there is no going back!
And it is actually a lot easier than you think.
Many people just want to record their own voice at home on their own computer. To do this as a basic level, you will need two things
- a microphone or headset microphone (preferably with a USB connector for high quality sound)
- some sound recording and editing software
This will give you a reasonable to good-quality recording system (in my professional opinion – great quality to most other people!), depending on what microphone and connectors you choose to use.
To get really high-quality sound recording using a computer, you will need to invest in at least a studio quality condenser microphone and maybe an external USB soundcard, the most convenient way to upgrade to high quality digital recording.
As far as recording and editing software is concerned, there is a huge range to choose from. To save you the time, trouble and expense of trying to find suitable software, I recommend the versatile, powerful and easy-to-use programme I use every day for my own recording and editing work – ‘Audacity’.
‘Audacity’ is a simple, user-friendly, ‘multi platform’ (Windows, Mac and Linux) sound recording and editing package for everyone from the complete beginner to the experienced pro.
This is all you need to record and edit on your computer
- ‘Audacity’ recording and editing software
- a ‘tie clip’, ‘headset’ or ‘condenser’ microphone
- speakers or headphones to listen back to what you have recorded
Computer Housekeeping: ‘Where’s That *#%@* File?’ Keeping It All Organised!
A quick note on ‘computer housekeeping’!
What I mean by this is, please get into the habit of keeping your files on your computer in some sort of order, so you know where to find them.
We’ve all ‘lost’ files…documents…letters…photographs… on our computers because we just save them anywhere and don’t keep them organised.
I highly recommend that before you start any recording project (audio or video) that you create a folder to keep your data and files related to that project in one place.
This includes any software that you might use for your audio or video projects – keep it all in one folder.
That way you will always know where it is, and if you ever need to reinstall any of the you can go straight to that ‘Software’ folder and find it easily.
And if you get into the habit of doing this for your audio and video projects it makes them really easy to back up because you can drag the whole folder onto your backup disk, USB stick are external hard drive for safekeeping, knowing that every single file in your project is contained in that folder and that the project will always open with all files included and nothing missing.
For more on recording audio take a look at my “Easy Audio” ebook series.
Recording A Live Presentation To Create An Audio Product
Do You Realise Just How Many Products You Can Make Out Of Just One Audio Recording?
If you speak or present live in any way on any subject to any number of people, then you have great potential to instantly & easily create audio products simply by recording your voice as you deliver your presentation.
There are a number of ways to do this. The easiest and least expensive way it a basic lapel or tie microphone and a pocket digital voice recorder.
I have used this simple set up for many reasonable to great quality recordings – totally usable as saleable products:
Olympus WS series recorder
- Select any model in your price range
- Make sure it records .mp3 files (it may also record as .wma and .wav).
- Set you recording quality to the highest possible (
- USB connector makes it supereasy to transfer audio to your comuter. Just drag and drop.
- For best results, always record at the highest quality setting possible. This will use up memory fastest, so you may want to consider memory size (Gb) and the option to expand with a memory card. If you copy your recordings to computer every few days and clear the recorder memory then you will not need to expand with a memory card..
Audio Technica 3350 tie-clip microphone or any decent minijack/3.5mm jack microphone from Maplin/Tandy/RadioShack/JB HiFi/Dick Smith – depending on your country. Remember to make sure the microphone battery has plenty of juice to last your recording time.
Click here for recommended low cost, super easy audio tools then follow this step by step guide to recording your presentation
Positioning the Microphone
1) You will need to clip the microphone to your clothes, so wear something that can hold the microphone in place without moving. You don’t want the microphone to fall inside your shirt or blouse and record the sound of clothes brushing across the microphone, or a muffles sound from inside your jacket.
2) Pass the microphone up under your shirt or inside your clothing and then clip the lapel microphone to your lapel just below your collarbone and as near to the centre of your body as possible.
Tuck the cable neatly out of the way so that you don’t pull on it by accident.
3) Make sure you can move your arms and body without covering the microphone or pulling on the cable.
NOTE: Your microphone may be battery powered. Remember to switch it on and use a fresh battery!
Connecting to the Voice Recorder
1) Check that the voice recorder has lots of battery power.
2) Connect the microphone jack (or plug) into the ‘microphone’ socket on the voice recorder.
3) Do a short test recording to make sure everything is connected, working and that you have good sound quality. Do this by playing the audio recording back, ideally through good quality headphones to really check on the audio quality before going ahead and recording your presentation.
Recording Your Presentation
1) I know this is obvious….but remember to PRESS RECORD before you start! Even after years of recording people professionally, I have to confess that very occasionally I have forgotten this myself…but luckily never missed anything too vital.
2) Start your recording with a spoken ‘audio’ label. Just say a few words straight after pressing record to clearly show what the recording is about. For example, your audio label maybe something like this:
‘21st of July 2011- Business presentation at the UK Professional Speakers Association on how to use video in social media, session 1 – why video and social media is important to your business…’
This is so that when you transfer your audio to your computer, you will easily be able to identify the recording and its contents just by listening to the first few seconds, and you can then label the file with the right details for easy reference.
3) Ideally your voice recorder will have a safety switch of some kind to ‘lock’ the record button in position so you are unable to accidentally switch the recording mode off while the recorder is in your pocket. Make sure this is on.
After Your Presentation
1) Create a folder on your computer to save all your recordings in, together with any other files you may have used during a presentation e.g. slide show, graphics, handouts etc. This is so that you have the option to create further products with your audio recording by adding slides and other visual material to the audio and creating a video from your MP3.
2) Transfer your recording(s) to your computer and label them with the right file name.
3) Your audio can now be edited by using a super easy editing program like Audacity to remove any gaps or mistakes from the recording. This can be done by simply selecting or highlighting the parts of the audio you want to remove and deleting them in exactly the same way as you would when working on a word processing document.
Once that’s done simply ‘export’ your edited audio as an mp3 and your audio product is ready to go.
Audio & Video ‘Done For You‘ – Click image below…
For more on recording audio take a look at my “Easy Audio” ebook series.
Audio Product Creation – What You Need
Low Cost, Easy To Use Audio Tools
Basic Equipment To Record At Home
- Headset microphone or
- Tie clip/lapel microphone
- computer (PC or MAC)
- Audacity FREE audio software
Microphones
I recommend using a microphone with a USB connector because the built in sound chip generally means better quality recording through the digital USB connection.
Minijack connectors go through the ‘standard’ computer sound card which can be noisy in some cases, but can also give good recording audio quality on some computers (mine sounds fine) – you’ll simply have to test for yourself.
Using a microphone with a deetachable USB adapter means more flexibility – you can to use either minijack or USB connectors depending on the circumstances.
Headset Microphone
The headset I use and recommend is the Sennheiser PC135 PC with a USB connection for high quality digital recording.
Sennheiser headsets have some simple but really useful features that adds to user comfort, flexibility and quality of any audio recording.
This is why I use them:
- this company makes professional studio recording microphones, so the quality is great
- they have a noise cancelling microphone to reduce background sounds
- the flexible microphone arm means easy positioning
- they come with a minijack connector and USB adapter for use with all PC and MAC audio connections
- they have a microphone on/off switch (very handy if you need to mute yourself on a call or a recording)
- the headphones volume control makes it easy to adjust the level of playback for any audio you are listening to
Audio Toolkit Essential – The Digital Voice Recorder:
Take it everywhere. Record everything. Take opportunities… and get creative!
Here is a list of Important specifications to consider when choosing a Digital Voice Recorder:
- High quality recording option (at least 64 kbps for mp3 and ideally a .wav option)
- Long recording time (15 – 20 hrs at high quality: 64 kbps /1Gb)
- Long battery time
- USB connection to transfer your audio easily to your computer
- a microphone input to connect a lapel mic. / tie-clip mic. direct into the recorder
- Make sure it saves the audio in either MP3, WAV or WMA format
Lapel / Tie-clip Microphone
Audio Technica ATR35S – High-quality omnidirectional condenser microphone

Recommended Models:
Edirol R-05 WAVE/MP3 Recorder
Other Options
Olympus WS-600S and Olympus WS-710M

Audacity: FREE Audio Recording & Editing Software
Click here to read more

Editing Audio On Computer – Screenshot
For more on recording audio take a look at my “Easy Audio” ebook series.
Why Audio Is the Perfect Product
And Why Not Selling Audio Products Will Cost You Big Money
- Audio is the easiest and quickest to produce…press record…just talk…press stop!
- No need to type
- No need to even sit at a computer: Record Interviews…Reports….Seminars…
- 90% less product creation time than typing
- Create high profit Audio products anywhere, anytime using a Digital Voice Recorder
- It’s much easier to capture and create verbal material than written material
- The ideal way to get your message out and connect with those who want your information, by using your voice
- It builds relationships
- …and it’s way more fun than typing!!!
- Nearly everyone has an iPod, mp3 players, a cell phone/audio player
- Audio is the most portable, convenient format, easiest to access and learn from at any time. Combine with text products for greater learning
- There is now an incredible growth in audio downloads, and the market is going to explode
- Audio is the fastest growing market for information products
- Audio is the most portable and most convenient form of information product
- 35% of people prefer to learn by listening to audio…that’s 1/3 of the entire market!
- Audio products have very high perceived value
- Audio products sell for three times the price of text products…FOR THE SAME INFORMATION!!
Royalty Free Music for your Hypnosis, Meditation & Relaxation Products
It can be quite a challenge to find good music that you can legally use for any kind of media production:
- video music ‘beds’ (music to use under a voiceover) or backing tracks
- soothing, calm music for slideshows and screencast presentations
- music for audio recordings: hypnosis, relaxation and meditation CDs or mp3s
Thought Sounds is a large collection of soothing, high quality, royalty-free soundtracks designed from the ground up to be used with brainwave entrainment, hypnosis and relaxation.
Perfect for Hypnosis, Therapy and Meditation
It is rare to find soundtracks that can be used effectively for therapy and hypnosis. As any experienced hypnotherapist will tell you, backgrounds need to be both slow in tempo and consistent throughout the entire session. If they are too distracting, the impact of the hypnosis script and any other elements will be severely diminished. A soundtrack ideally suited for therapy is incredibly hard to accomplish without creating a boring, overly repetitive composition. As a result, therapists can spend years building up a collection of acceptable compositions that only a handful of clients actually enjoy.
Here is an overview of what is included:
70 soothing and thought-provoking soundtracks
- Warm, soothing ambience
- Ethnic inspired soundtracks (Indian, Celtic, Middle Eastern, Asian, etc)
- Weightlessness, Floating, Outer Space soundtracks
- Spiritual (choir, meditation, shamanic)
- “Primordial” Sounds
- Nature (rain, forest, etc) combined with ambient sound
- Unique Musical Tracks
66 soundtrack variations
In addition to the 70 main soundtracks, we have also included 66 variations. Variations are based on the main 70 soundtracks, but use different arrangements, instruments and techniques. This gives you more flexibility and many additional options. You could, for example, have a single soundtrack as a main theme for your audio production, and use the variations to set a different mood or add variety.
Here is a short sample of 12 of the tracks
Right click and ‘Save As’ to download
Free copy of Perfect Loop 1.0 software
Perfect Loop is a simple, easy to use application designed to work with Thought Sounds soundtracks. Its main function is to allow you to expand a soundtrack to any length you require. It also allows you to add fades, Volume and other effects to the soundtrack.
Collection Features:
- Designed to act as effective carriers for brainwave entrainment
- 100% Royalty Free! – Use Thought Sounds with your clients or in your commercial projects
- All soundtracks are at a relaxing 40 bpm, perfect for relaxation, meditation, trance, etc
- Tested to loop seamlessly with the default settings of our software
- All soundtracks are in production quality (320 kbps) mp3 format
- Affordable, even for personal users.
By themselves, even without added scripts, effects, or entrainment, these Thought Sounds soundtracks are profoundly relaxing. Brilliantly composed, they are also fascinating and innovative musical pieces, adding a new dimension to any audio/visual experience.
For More Posts on Recording Audio Products – Click Here
These ‘Easy Audio‘ ebooks below tell you everything you need to know about recording audio, editing your recordings (including deleting mistakes) and creating your own CDs and mp3.
Now available at less than half the original price.
Skype Recording Product
Lots of people ask me about recording Skype calls, for
- interviews
- coaching
- mastermind groups
- mentoring
- training
- affiliate calls
- many other uses…
There are two products I recommend that make recording Skype calls ‘Super Easy‘: Prettymay & Pamela
They both offer a wide range of features and can trial each product for free.
I chose ‘Prettymay‘ because at the time I researched both programmes it had some features that ‘Pamela‘ did not.
The latest version of ‘Pamela is now ahead of Prettymay with the ability to record video calls.
Click on the links to compare.
I’m creating my own on screen video tutorial product to answer all the questions I get about recording, editing and creating finished audio products from Skype calls.
I’m planning the content and want to include all common problems and questions about recording skype calls and editing audio, so to help me out and make sure it’s complete, please type your qustion into the survey below.
Thank you.

