Choosing The Right Microphone – Part Two
So – What Microphone Do I Need?
I guess after reading ‘Choosing The Right Microphone – Part One‘ you are still wondering….’what microphone do I need?‘ – A headset, like one you’d use for Skype calls? – A lapel or tie-clip mic? – A large diaphragm ‘studio’ condensermic? You’ll need different mics for different jobs, and below you’ll find an overview of what you need to know to make a more informed decision.
My Microphone Choice
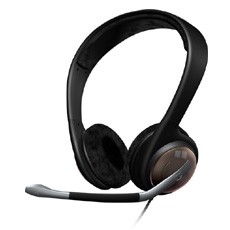
I use a Sennheiser PC155 headset with mini-jack connectors (around $99) on a standard laptop pc with no special soundcard for all ausio and ‘off-camera’ video recording. Sennheiser have been making quality microphones for over 70 years and are used by top level studio and stage professionals worldwide. This is why they know how to make a good product and why their headsets sound great. Everyone says that my audio sounds great and that is all the feedback I need. There are various things I can do to process the sound and make it richer and warmer (noise reduction, compression, equalisation – in that order) but I don’t need to – it sounds great just as it is. Just record, edit and release the product.
Computer Audio
Now it is true that ‘ordinary’ computers and laptops have low quality sound components (Macs have reasonably good audio compnents built in) and that often this can lead to low sound quality recording and playback. However, if you choose a good quality headset with a USB option (most Sennheiser headsets come with a USB adaptor) this will feed a good quality digital signal direct into your computer and result in ‘good’ to ‘great’ sound quality for a simple, easy to use, ‘plug in and record’ portable recording set up. To help you decide what is best for you and your recording needs and preferences, here are the…
Pro’s & Cons 3 Common Microphone Types
Microphones that you would use for audio products, video shoots and online voice calls.
A headset, like one you’d use for Skype calls (see above)
Pros
- The microphone is a close and consistent distance from your mouth, which means instant consistent sound levels and intimate voice recording
- Low cost and easy to look after
- Convenient to use, store and travel with
- Multi-use: audio recording, skype calls, video voice over…
Cons
- Low cost or cheap brand units (mini-jack or USB) can sound thin and noisy
- Closeness to mouth sometimes records ‘sticky mouth’ sounds! (HOT TIP! Can be alleviated by eating slices of green apple…)
- It doesn’t look great on camera! So get a lapel mic. too…
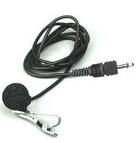
Lapel or tie-clip mic
Pros
- clips to clothing at mid chest to collar bone height so not obvious in video shot
- recommended for indoor video shoots only
- connects direct to camera audio input socket
- if mic is not centred or is too low, can give inconsistent recording levels
- side to side head movement or looking up while speaking changes recording levels
- low recording level will usually include background noise and hiss which had to be removed in the editing process
- many take a battery, so check you have power before recording, and you switch off afterwards
- outdoor use will usually record wind noise which is troublesome and not easy to remove (a foam ‘wind shield’ on the mic. can help)
Large diaphragm ‘studio’ condenser mic (USB)
Low cost ‘studio’ condenser mics such as the Samson C-01, Blue Snowball and Rode Podcaster are consumer mics built to a price for the podcasting and home recording market (and so provide good quality audio but not really ‘studio’ quality – this involves more than just a mic.). These mics bring good quality ‘studio’ voice recording at an affordable price, but for ‘studio’ quality sound there are other factors to consider beyond than just plugging in and recording (which is all you need to do at base level).
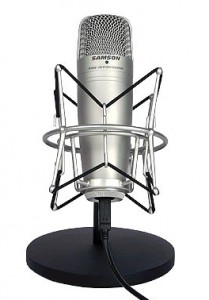
Samson CO1U (USB Condenser Microphone)
Pros
- crisp, warm and authentic reproduction of your voice
- use close to mouth (8-10 inches) for intimate sound
- using a ‘pop’ shield reduces ‘popping’ the sound of your natural voice ‘plosives’ (hold the palm of your hand close to your mouth and say ‘pepperoni pizza’ and feel the blast of air on your skin – this sounds like a hurricane on a condenser mic!)
- use for audio recording, video voice over – can look good on camera
Cons
- condenser mics need looking after well
- highly sensitive to knocks, humidity & damage
- the very lightweight and sensitive diaphragm can collect dust over time which reduces response and therefore audio quality
- must be used in a VERY quiet environment as they will pick up ALL background sound
- mic and stand can be cumbersome to set up
- not compact (mic, stand and pop shield) and they don’t travel well
Summary:
By all means, use a USB condenser mic to give you that edge of crispness, warmth and greater accuracy in voice recording, but consider whether you really need that within the context of all the above – it is not essential to use a condenser mic to get a great sounding audio product. When recording professional audio I stayed well away from the philosophy of ‘it’s good enough for rock and roll’. However, when it comes to home recording for audio products, getting a ‘good enough’ sound with easy to use, convenient equipment makes life simpler and allows you to focus on content and delivery. Read Choosing The Right Microphone – Part One‘
* * * * * * * * * * * * * * * * * * * * * * * * * * * * * * * * *
Choosing The Right Microphone – Part One
One thing that often concerns people when it comes to audio (and video) is equipment – e.g. which microphone is ‘best’ for recording audio products?There is much to say on this subject and it can get quite technical, but here is the supereasy answer.
There is no ‘best’ microphone, but there are recommendations, depending on your preference and budget.
The bottom line is it’s more important that you have a microphone that you are comfortable to use and that will get you good results, than being concerned about whether your audio is of top quality, simply because there are many factors to consider to get great studio quality recording.
Hear’s the Difference!
Here’s the thing. Despite what you may have been told, most people really do not hear the finer points of your audio recording, because it’s generally information they want – solutions to a problem – not hi-fi audio (which can be difficult to achieve well at home).
No one will buy your product over someone elses because you use a ‘studio’ microphone and your competitors don’t.
Most people won’t hear the difference, and this is how I know.
Firstly, the hundreds of people I trained in audio recording over about 10 years (with many listening tests in studio conditions) showed that very few people (even audio students) can tell the difference between sound recordings you imagine would be very obvious to most.
Secondly, everyone is used to hearing a wide range of audio quality, ranging from over produced, full, rich sounding FM radio and TV commercial audio with booming voices… through to thin and scratchy sounding mobile phones and standard telephone landline audio – (teleseminars recordings make great high-selling products and are of low
audio quality).
Consumers are not focused on audio quality when they buy an information product (unless it sounds really bad of course!) – they are focused on the information (the one exception is hypnosis and meditation audio which is a whole specialist area by itself).
This is why most people will buy an audio product from you – because it provides a solution to their problem – not because it sounds great!
Thirdly, most people play audio back on crappy sound systems anyway!It always amused me that thousands of hours go into producing a great sounding music project, sometimes on millions of dollars of the absolute best audio equipment in the worlds top studios….only to be played back on a $10 easily scratched plastic disc… mostly on cheap and badly set up sound equuipment… usually by someone who just wants to turn the sound up loud… without noticing or caring about the finer points of audio production.
Audio Info Products: What To Focus On
After 3 decades in professional audio, it has taken me many years to get over my conditioned focus on hi-fi audio for info products, and to know that there are two things people primarily want in any audio or video product
1) good quality information from a credible source
2) certainty demonstrated by the person delivering the information that they know what they are talking about
A studio microphone won’t do that for you!
So…what microphone do you need?
Click here for ‘Choosing The Right Microphone – Part Two‘
* * * * * * * * * * * * * * * * * * * * * * * * * * * * * * * * * * * * * * * *
Audio Editors Mindset
I spent most of my years as a professional sound engineer working on studio music sessions, recording anything from heavy-metal through to Yugoslavian folk songs, and from light Opera through to acid techno dance music …sometimes in the same day!It was an interesting time with a great of variety of people and different styles of music.
I also enjoyed the thrill of working at many live events such as WOMAD and Glastonbury, and London’s South Bank and Docklands festivals. Live events are always full of surprises, with the potential for things to go horribly wrong, either minutes before a band went on stage…or in the middle of the show in front of 12,000 people!
Actually things very rarely went wrong, but that’s because at a live show you work really hard to make sure everything goes right…because there is no second chance!
And then there were the studio editing sessions…
Listening to the same piece of music…or speech….in great detail….sometimes over and over again….sometimes for hours and hours…..just to get the edit perfect.
Not the most glamorous part of audio production, but one that makes a huge contribution to a high quality end result.
Audio Editing Engineer: A Glamorous Job?
I was the main editing engineer in a busy London studio for a few years, and I got to do pretty much all the editing work.
There was one editing session which was working with a recording of a corporate presentation that was several hours long. I think they recorded the whole day…and it was my job to edit it.
The guy who did the presentation didn’t do a very good job, and whatever it was he was speaking about was incredibly boring…well, to me, anyway. And the worst thing was that every three or four seconds he ‘ummed’ and ‘erred’….for hours and hours…all day long.
And guess what?
It was my job to edit the recording and remove all the ‘umms’ and ‘errs’ from this guy’s speech (zzzzzzzzz……..) to make him sound smooth and slick!
It took me something like three full days of concentrated editing to clean up this guy’s presentation and make it sound like a well rehearsed presidential address!
By the time I’d finished with him, he sounded absolutely fantastic…(even if I say so myself)…and absolutely nothing like the fumbling, mumbling recording I was presented with…
…and it was the single most mind numbing and boring job of my entire recording career!
But I learnt a great deal in that editing suite, and I want to share the key points with you in the following pages.
Audio Edting Is Easy
I wrote this book as a simple guide to editing audio, so that you could take voice recordings made on your computer or on a digital voice recorder and edit them to a good standard.
Editing audio is not difficult at all. In fact it is very similar to editing text in a ‘word’ document, just like you would in a letter.
The principles are exactly the same.
In audio editing, you are still working with words on your screen, except these words are in the form of sound waves instead of typed out groups of letters, phrases and sentences.
In simple terms, you ‘highlight’ the audio you need to edit and use ‘cut’, ‘copy’, ‘paste’ and ‘delete’, just like when you type something out and make mistakes or want to make changes.
I would guess you’re properly already quite familiar with working like that in some way.
The big difference in working with audio, especially with speech, is that you have to listen…carefully.
You have to listen to the words that are being said, to identify exactly which you want to keep, which you want to delete and sometimes which words, phrases or sections you may want to cut and paste into a different part of the recording.
Most Important
You also have to make sure that the recording ‘flows’ naturally. It’s important to remember that we all listen to the human voice every single day, and have done since the day we were born. So we are very familiar with the subtleties of human vocal expression.
In other words, when we speak we communicate with far more than just the words we choose to use. A great deal of communication is in the vocal tones that we use, the way we actually use our voices to express a certain feeling.
When you are editing speech and you make changes to the way the sentences were originally spoken, it is important to check that the edited speech still sounds like it flows naturally.
Remember, you can always ‘undo’ your last edit if it doesn’t sound right by using the ‘Ctrl’ and ‘z’ keys together, or by selecting ‘undo….’ from the edit menu.
Edit Sound By Looking!
Editing audio is as actually made much easier just by seeing the sound waves on screen. You can see everything clearly, and with a bit of practice you will begin to link the words you hear to the shapes you see on your computer screen.
That in itself is a big step forward, and your audio editing speed will increase dramatically when you reach this point.
Apart from listening carefully, the other important point to keep in mind is the big picture – what will the end result sound like?
You may be taking several sections of audio from different recordings to edit into one final piece, a bit like a radio show, with a main presenter, sound bites, bits of music, interviews, some advertising etc. It’s important to know what you want the whole thing to sound like once you have finished.
You can do this in your head or on paper, but plan it out somehow. It will make your job much easier…
Taken from my ebook ‘Easy Audio Editing’ – ‘How To Edit, Clean Up, And Remove Noise From Your Audio’ – a series on audio recording, editing and product creation.
Success with Audio & Video: What is REALLY Holding You Back?
It’s been very interesting to get inside the minds of coaches through a simple survey I did recently – thank you very much if you took part.
If you think about it, everyone does a little coaching now and then – in your business, with your friends, with your family… – so what I’m talking about here, the ‘psychology’ of coaching, probably applies in some way to you too.
What’s interesting is that what I found out with this survey (and in my experience of coaching my own clients) is true for pretty much any other type of ‘solopreneur’ or business…so read on even if you don’t consider yourself a coach of any kind.
It seems many ‘coaches’ believe they don’t have the time or money to invest in simple yet very effective growth strategies for their coaching business.
Yet things like Facebook and YouTube marketing (which are FREE!) can be easily done in 30 minutes a day, a couple of time a week, with tools you already have – no financial investment needed.
Can you do this?
YES!
Do you have a really good reason not to?
Probably not!
Aren’t you curious to find out why this is such a problem? Why people don’t even take the FREE and easy option when it is right there under their nose!
Part of this is ‘what is the first step’…but that is not the biggest reason.
The other great insight that came from this survey was how many coaches are ‘not ready’ to do this (Facebook/YouTube video marketing or other simple strategies, like recording a short audio interview to create a product… even daily message posting on Facebook makes a difference)…. or ‘are planning this in a couple of years time’!
Wow!
These are people who want to make more money…but are not planning on taking these super easy and low cost (or no cost!) action steps for maybe two years!
I really don’t mean this with any judgement…and at the same time I couldn’t quite believe what I was reading!
We are talking about coaches here. People who coach OTHER PEOPLE about making empowering decisions and taking action – NOW!
Quite an eye opener.
But also totally understandable. I know we’re all human and operate in essentially the same way.
This is what I have learned in all my years of working with coaching clients, one on one or in groups.
It is NEVER really time, money or technology that stops people moving forwards with their business.
It is ourselves.
We know this.
But the irony is that ‘we’ still get in the way of our own greater success.
I do it too. How about you?
If this is you, and you really want to grow your business, get more clients and make more money then I seriously suggest you commit to three 90 minute coaching sessions WITH YOURSELF and ask yourself what is the real reason behind the excuses you give yourself and others that ‘hold you back’ from moving forwards NOW!
Provocative, I know.
But I wouldn’t be a great coach without it.
Product Creation: the First Simple (and Too Often Overlooked) Step
 It can be really exciting to have a great idea about a new business, product or service you can provide to your clients or market, whatever niche you are in, especially if it’s something you think no one has done before and you have a feeling that it could be really successful.
You may have great enthusiasm for your new project and find yourself pouring all your time, energy, money and resources into something that seems like a surefire winner.
Hundreds of hours… thousands of dollars (millions – it has happened)… into something that you ‘just know’ is going to sell…
And you may be right!
You may well have hit upon a formula for a product or service in exactly the way to market wants and needs right now and it could lead to great rewards and opportunities, financial and otherwise.
However…you may be wrong!
There is one thing that most people, even experienced business folk, often overlook in their naiveté and enthusiasm about bringing a new product or service to market… and that is the simple principle of having a good solid plan based on market research.
Missing out this vital step could be a very costly mistake!
And one that can be easily avoided…
How can you confidently know what products and services to create?
How can you be sure that your time, money and energy will be invested wisely in something that your clients, commnity or the market in general will want to buy?
There is a super easy solution…
Possibly the Simplest Business Plan Ever
A wise & very wealthy man (Keith Cunningham – the ‘ Rich Dad’ in Robert Kiyosaki’s famous best seller) once told me his very simple 3 step business plan:
- Find out what they want
- Go and get it
- Give it to them
Incredibly simple. Incredibly effective.
I have not yet found a simpler business plan that is more guaranteed to bring you success at any level, in any market and in any economy.
So if you are someone who wants to expand your income opportunities but just doesn’t know where to start or what product or service to provide … there is an incredibly simple first step.
Ask!
Simply ask your current clients, your future prospects or those in your community what they most need right now to answer their most burning questions and solve their biggest problems.
How do you do this?
The simplest solution is a survey, which can be done online, via e-mail, embedded in a website or pre-technology style – with a pen and paper!
The bottom line is that before you invest any time, energy, money or resources of any kind in any business venture at any level, do your research so that you can confidently go forwards knowing exactly what the market wants and then create your products and service to meet those exact needs.
Once you have identified a problem, you can then move towards providing a solution, which may be something as simple as a guidebook, video tutorial or audio training programme… which leads to the next step in the process.
How do you create your first simple product?
What is the next step after market research?
What simple audio or video equipment do you need, and how do you use it?
Well, the answers to those questions are here at SuperEasyAV…and on a series of Free videos I have created to help get you started.
This is also where I apply the principle I have just relayed to you – a simple survey.
Help me to help you grow your business with your very own audio and video products by telling me exactly what you want and need right now to get you to where you want to be.
In return for your time in completing this short survey I’ll send you 6 FREE Training Videos to get you started with audio & video today (plus a surprise Super Bonus for those who are quick!).
Click on this link to complete your survey.
– – – – – – – – – – – – – – – – – – – – – – – – – – – – – – – – – – – – – – – – – – – –
Audacity: Free Audio Recording & Editing Software
Hmmm… Some Features I’ve Seen Before Somewhere!
If you are used to using a computer, there will be things about ‘Audacity’ that are already familiar to you. In many ways, working with ‘Audacity’ will be just the same as working with a word processor.
If you can
- type a letter
- delete words and phrases
- copy and paste words and phrases
- and save your letter…
… then using Audacity is going to be really easy for you!!
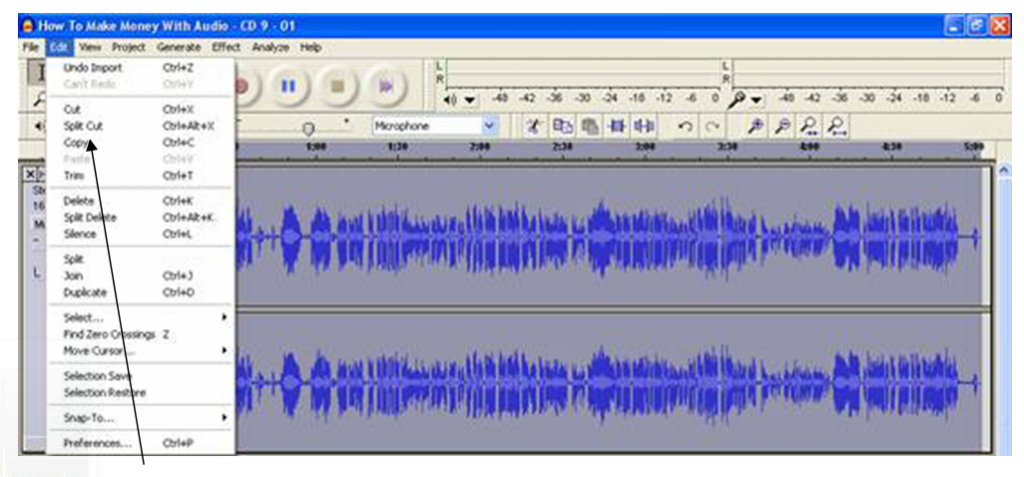
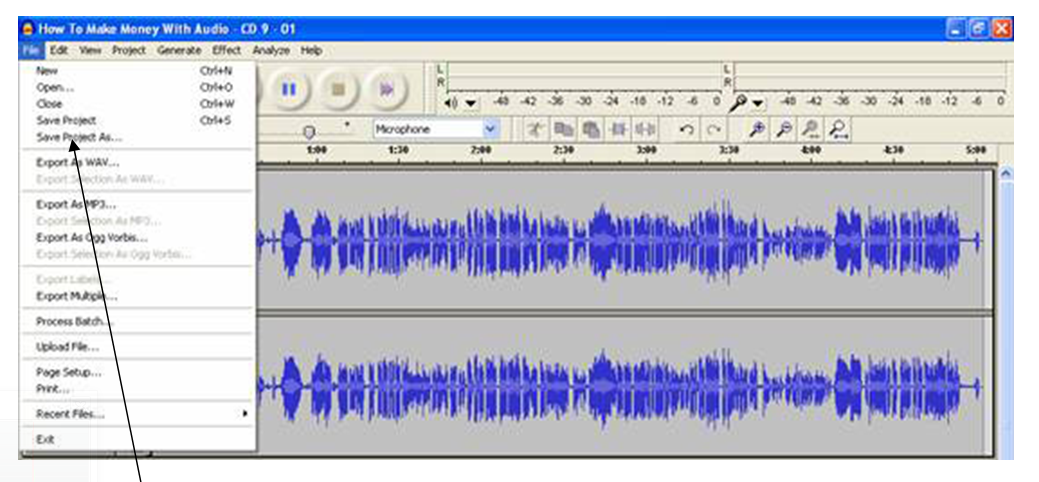
In the top left-hand corner of the screen there are number of menu items. You can see the ‘File’, ‘Edit’, ‘View’ and ‘Help’ menu’s which in many ways have exactly the same features as a word processor.
The ‘File’ menu (above) for example has these familiar functions
- ‘new’ – for new projects
- ‘open’ – to open existing projects
- ‘save project’ – to save existing projects
- ‘close’ – to close existing projects
(A ‘project’ in ‘‘Audacity’’ is a collection of all the different sounds and recordings you have in one recording project – for example, your voice and some background music – which you can ‘save’ as a project to finish working on another day).
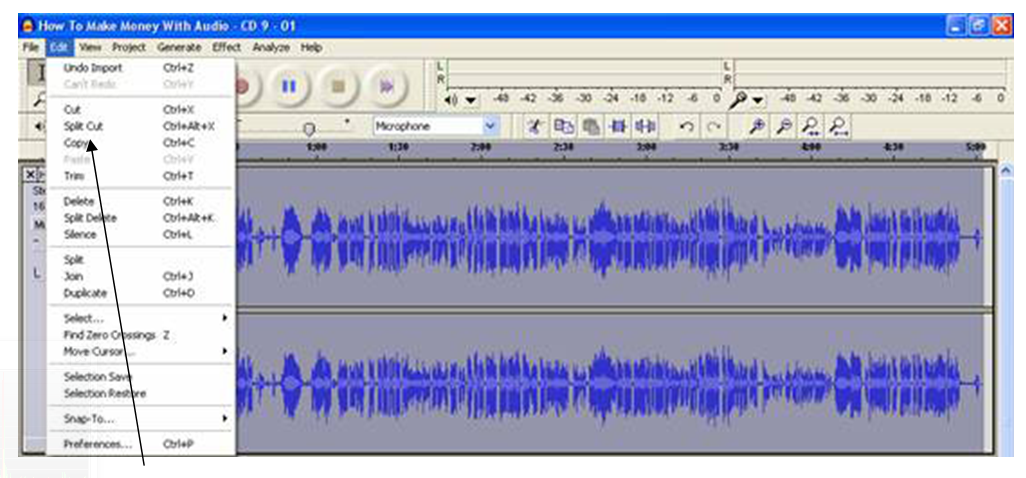
The ‘Edit’ menu (above) has
- ‘cut’ – to cut sections of audio
- ‘copy’ – to copy sections of audio
- ‘paste’ – to paste to sections of audio
The ‘view’ menu (below) has a ‘zoom’ facility.
- to zoom in and magnify the soundwave for a more detailed view
- to zoom out and see the overall view
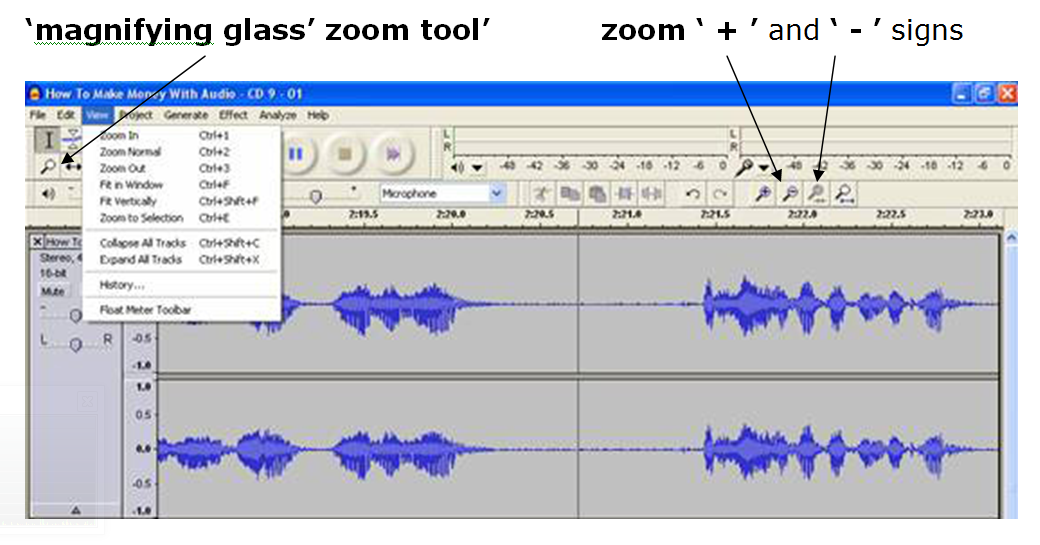 I have clicked on the zoom ‘ + ’ a few times in the above picture, and you can now see the magnified soundwave in more detail.
Please note: it’s much quicker and easier to use the ‘magnifying glass’ zoom tool (with the ‘ + ’ and ‘ – ’ signs) towards the right hand end of the tool bar.
So as you can see, so far many of the basic functions are pretty much the same as you would use when writing a letter or any other text document and the basic principles of editing an ‘ audio document’ are exactly the same.
Simply select the area you want to delete, cut or copy by clicking and dragging your mouse to highlight it (just as you would in a standard word processor) and then delete (or select or new point in the audio to paste from the clipboard– just as you would in a letter or e-mail).
If you make a mistake, simply ‘Undo’ (in the ‘Edit’ menu or use the ‘control’ & ‘Z’ keys).
This is just a brief overview and introduction to audacity, and as you can see it is a very simple programme with familiar controls and concepts which you will find yourself getting used to and using quickly and easily.
This post was adapted from my “Easy Audio” ebook series.
Audio Recording on a Computer
The Complete Recording Studio in One Box!
Audio recording on a computer is without a doubt the most powerful and flexible way to record. Once you have learned the basics of recording on computer there is no going back!
And it is actually a lot easier than you think.
Many people just want to record their own voice at home on their own computer. To do this as a basic level, you will need two things
- a microphone or headset microphone (preferably with a USB connector for high quality sound)
- some sound recording and editing software
This will give you a reasonable to good-quality recording system (in my professional opinion – great quality to most other people!), depending on what microphone and connectors you choose to use.
To get really high-quality sound recording using a computer, you will need to invest in at least a studio quality condenser microphone and maybe an external USB soundcard, the most convenient way to upgrade to high quality digital recording.
As far as recording and editing software is concerned, there is a huge range to choose from. To save you the time, trouble and expense of trying to find suitable software, I recommend the versatile, powerful and easy-to-use programme I use every day for my own recording and editing work – ‘Audacity’.
‘Audacity’ is a simple, user-friendly, ‘multi platform’ (Windows, Mac and Linux) sound recording and editing package for everyone from the complete beginner to the experienced pro.
This is all you need to record and edit on your computer
- ‘Audacity’ recording and editing software
- a ‘tie clip’, ‘headset’ or ‘condenser’ microphone
- speakers or headphones to listen back to what you have recorded
Computer Housekeeping: ‘Where’s That *#%@* File?’ Keeping It All Organised!
A quick note on ‘computer housekeeping’!
What I mean by this is, please get into the habit of keeping your files on your computer in some sort of order, so you know where to find them.
We’ve all ‘lost’ files…documents…letters…photographs… on our computers because we just save them anywhere and don’t keep them organised.
I highly recommend that before you start any recording project (audio or video) that you create a folder to keep your data and files related to that project in one place.
This includes any software that you might use for your audio or video projects – keep it all in one folder.
That way you will always know where it is, and if you ever need to reinstall any of the you can go straight to that ‘Software’ folder and find it easily.
And if you get into the habit of doing this for your audio and video projects it makes them really easy to back up because you can drag the whole folder onto your backup disk, USB stick are external hard drive for safekeeping, knowing that every single file in your project is contained in that folder and that the project will always open with all files included and nothing missing.
For more on recording audio take a look at my “Easy Audio” ebook series.
Recording A Live Presentation To Create An Audio Product
Do You Realise Just How Many Products You Can Make Out Of Just One Audio Recording?
If you speak or present live in any way on any subject to any number of people, then you have great potential to instantly & easily create audio products simply by recording your voice as you deliver your presentation.
There are a number of ways to do this. The easiest and least expensive way it a basic lapel or tie microphone and a pocket digital voice recorder.
I have used this simple set up for many reasonable to great quality recordings – totally usable as saleable products:
Olympus WS series recorder
- Select any model in your price range
- Make sure it records .mp3 files (it may also record as .wma and .wav).
- Set you recording quality to the highest possible (
- USB connector makes it supereasy to transfer audio to your comuter. Just drag and drop.
- For best results, always record at the highest quality setting possible. This will use up memory fastest, so you may want to consider memory size (Gb) and the option to expand with a memory card. If you copy your recordings to computer every few days and clear the recorder memory then you will not need to expand with a memory card..
Audio Technica 3350 tie-clip microphone or any decent minijack/3.5mm jack microphone from Maplin/Tandy/RadioShack/JB HiFi/Dick Smith – depending on your country. Remember to make sure the microphone battery has plenty of juice to last your recording time.
Click here for recommended low cost, super easy audio tools then follow this step by step guide to recording your presentation
Positioning the Microphone
1) You will need to clip the microphone to your clothes, so wear something that can hold the microphone in place without moving. You don’t want the microphone to fall inside your shirt or blouse and record the sound of clothes brushing across the microphone, or a muffles sound from inside your jacket.
2) Pass the microphone up under your shirt or inside your clothing and then clip the lapel microphone to your lapel just below your collarbone and as near to the centre of your body as possible.
Tuck the cable neatly out of the way so that you don’t pull on it by accident.
3) Make sure you can move your arms and body without covering the microphone or pulling on the cable.
NOTE: Your microphone may be battery powered. Remember to switch it on and use a fresh battery!
Connecting to the Voice Recorder
1) Check that the voice recorder has lots of battery power.
2) Connect the microphone jack (or plug) into the ‘microphone’ socket on the voice recorder.
3) Do a short test recording to make sure everything is connected, working and that you have good sound quality. Do this by playing the audio recording back, ideally through good quality headphones to really check on the audio quality before going ahead and recording your presentation.
Recording Your Presentation
1) I know this is obvious….but remember to PRESS RECORD before you start! Even after years of recording people professionally, I have to confess that very occasionally I have forgotten this myself…but luckily never missed anything too vital.
2) Start your recording with a spoken ‘audio’ label. Just say a few words straight after pressing record to clearly show what the recording is about. For example, your audio label maybe something like this:
‘21st of July 2011- Business presentation at the UK Professional Speakers Association on how to use video in social media, session 1 – why video and social media is important to your business…’
This is so that when you transfer your audio to your computer, you will easily be able to identify the recording and its contents just by listening to the first few seconds, and you can then label the file with the right details for easy reference.
3) Ideally your voice recorder will have a safety switch of some kind to ‘lock’ the record button in position so you are unable to accidentally switch the recording mode off while the recorder is in your pocket. Make sure this is on.
After Your Presentation
1) Create a folder on your computer to save all your recordings in, together with any other files you may have used during a presentation e.g. slide show, graphics, handouts etc. This is so that you have the option to create further products with your audio recording by adding slides and other visual material to the audio and creating a video from your MP3.
2) Transfer your recording(s) to your computer and label them with the right file name.
3) Your audio can now be edited by using a super easy editing program like Audacity to remove any gaps or mistakes from the recording. This can be done by simply selecting or highlighting the parts of the audio you want to remove and deleting them in exactly the same way as you would when working on a word processing document.
Once that’s done simply ‘export’ your edited audio as an mp3 and your audio product is ready to go.
Audio & Video ‘Done For You‘ – Click image below…
For more on recording audio take a look at my “Easy Audio” ebook series.
Audio Postcards!
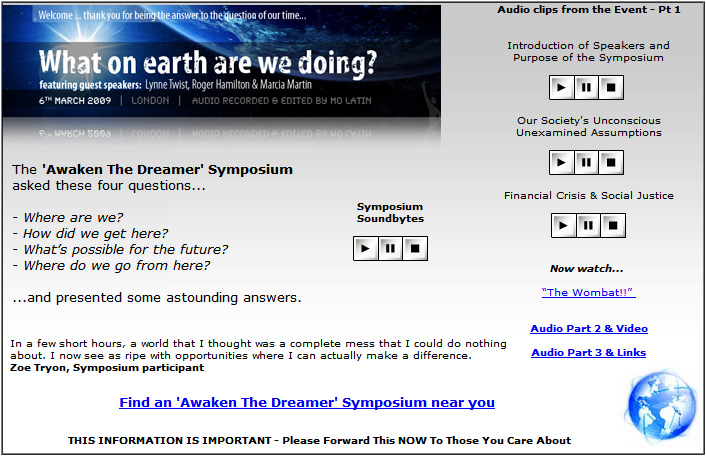
Here’s a unique and interesting way to deliver an audio message and promote your products or services – an ‘audio postcard’.
You can add your own text, links and images and then choose a ‘stamp’ from around the world.
An Audio Postcard By Instant Audio
Below is one of a series of three audio postcards I created after recording a fascinating and moving event called’ What On Earth Are We Doing‘ which questions our behaviour a a society and the way we choose to interact with our environment.
The content is very thought provoking and well worth listening to, and the ‘postcard’ format gives it a different look and feel to ‘normal’ web pages which might just increase the ‘share’ factor.
Audio Testimonials
Audio Testimonials
- an incredibly powerful way to use website audio
- captures the emotional expression which adds massively to the effectiveness
- social proof that you get results
- allows your clients to sell for you
- adds credibility to your business
- adding your customers name, city/country, picture and website URL gives the testimonials even more credibility
Toll Free Audio Testimonials for Your Business – FREE Trial
Jayne Harvey – NLP Master Practitioner
www.CrackTheCancerCode.com

Naomi Sesay – Quantum Life Coach & NLP Practitioner
www.GlobalInfinity.co.uk

Tosin Ogunnusi – Coach and NLP Trainer
www.Self-FocusConsulting.com

Mark Harrison – www.YourNegotiationExpert.com

Trevayne Cox – www.SuccessTicklers.com

Ben Nash – Bells Beach, Jan Juc, Victoria, AUSTRALIA
Tom O’Connor – www.livingoutsidethebox.co.uk
Jenny Black – Photographer. London UK
Ben Brophy – ‘Play Music’ Independent Dance Music. UK
Toll Free Audio Testimonials By Phone
If you would like to record an audio testimonial for me at any time about how SuperEasyAV has helped you and your business, then here is the number.
And do remember what it takes to get a great customer testimonial!
1) Please give your name, the city and country you’re from and your website or email address, if you’re happy to do this (adds credibility).
2) Please name my product or service, and say exactly how it has solved your problems (this is ‘before’ and ‘after’ evidence to show that SuperEasyAV has helped solve your problems).
3) Please say what the specific benefits of using my product or service been to you, and what difference it has made to your business and to your life (the direct benefits and results of investing time and money in SuperEasyAV).
My toll-free testimonial recording line is:
US callers may use 1-800-609-9006 x 7284
International callers may use 678-255-2174 x 7284

